Thursday, March 29, 2012

Decorating for Easter!

Ever since MDD was born, I've derived great joy from the simple act of decorating our house in celebration of holidays. I like to have at least a little tribute to each holiday here and there throughout the house. Even though MDD has her own home now, I still enjoy carrying on this tradition!  

This week I began decorating in celebration of the Easter season. In honor of this special season, I placed green moss and a few natural looking Robin's egg blue eggs (from Pottery Barn) in the bottom of a French wire ware basket.


In my Dining Room, I placed more of these beautiful blue eggs in an antique silver egg server and surrounded them with natural colored raffia to resemble a bird's nest.


Every Easter I place a couple of vintage postcards in a double-sided "menu holder." I collect vintage holiday postcards and you can tell what the upcoming holiday is by whatever postcard is in this holder!


To add some softness to this little grouping above, I added a whimsical plant and placed a few glitter eggs on the top to resemble eggs "hidden" in the grass and ready for an Easter Egg Hunt.


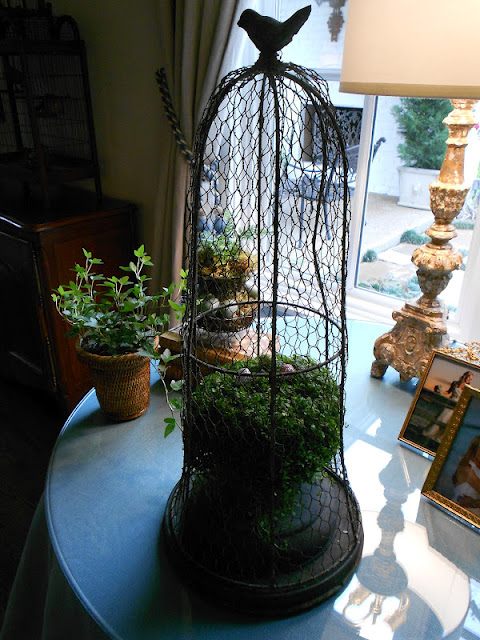
I also placed one of these plants and glittered eggs inside a beautiful, whimsical planter with a chicken wire dome!


Lastly, to enjoy a bit of the holiday outside, I placed a mercury glass style Easter egg in a planter on my patio!


Au revoir, Mitty

Wednesday, March 21, 2012

Adding a Vintage French Bistro Table to Your Decor!

Monday I shared with you pictures of a wonderful vintage French bistro table I purchased at auction and am adding to MFFC Store! 

I started looking at magazines and French design books looking for designs that incorporate bistro tables.  I found quite a few and thought I'd share with you the creative ways designers are using vintage French bistro tables in their designs.

Enjoy!


Notice the vintage French Bistro table placed between the two oversized chairs in this room designed by Interior Designer, Jane Moore. I love, love, love this room.  This picture captured me as soon as I saw the blue hydrangeas and the bistro table "sold me."
(Photo courtesy of Veranda Magazine)


Notice how Susan Arnold used this little French bistro table in the Great Room of her Tulsa, Oklahoma home.  What can I say about this home other than French Inspired PERFECTION!


Susan Arnold also incorporated two French bistro tables into her beautiful library's decor.
(Photos of Susan Arnold's home are courtesy of Veranda Magazine)


This photo shows a wonderful vintage French bistro table in a bedroom in the French home of antiques dealer Appley Hoare.
(Photo courtesy of "Essentially French" by Josephine Ryan)


Vintage French bleu bistro table in the guest bedroom of London antiques dealers Victoria Davar and Shane Meredith.
(Photo courtesy of "Essentially French" by Josephine Ryan)


I love rooms in which pieces that are typically used outside find a new home inside. I love their unexpected appeal and impact.

Au revoir, Mitty


Monday, March 19, 2012

Auction Find - A Wonderful Old French Bistro Table!

Well the auction I attended (the weekend after my last MFFC post) was really a good one - lots of "French" things. Unfortunately, many of the buyers were purchasing for the upcoming Round Top Antiques Fair in April. This renowned antique show draws antique lovers from all over the country and the vendors can command some pretty steep prices for their goods. So, needless to say, they were bidding at the auction like the sky was the limit on some of my favorite items. (I usually set a limit to what I will pay for an item and I go no higher.)

I did win a few wonderful things though and MDD was able to purchase a few really nice items as well!

Take a look below at my favorite purchase...............a wonderful, old, metal French bistro table!

This little table is 24 1/2 inches in diameter and the perfect size to use as a chair side table or, of course, a table for two!


For these photos, I placed the bistro table beside my reading chair in my bedroom. It is the perfect size for a small lamp, a book and a cup of tea or a glass of wine!


It looks like this table was never painted, or if it was, all of the paint has "chipped" off. The effect is a wonderful rusty brown, aged look. Don't worry though, I'm not charging extra for the rusty patina!  


I love the graceful scrolled legs on this little table.

This little table will be in MFFC Store tomorrow and will be here waiting for a new home. I'll take care of it until then.

Au revoir, Mitty

Friday, March 9, 2012

Antiquing With MDD!

I'm off to a couple days of treasure hunting with MDD!  I think I may have "created a monster!" MDD's almost as excited as I am at the prospect of a couple days of looking for that perfect find!

We're headed out to preview an auction and then, hopefully, bid on and "win" a few items at the actual auction tomorrow. You never know............

On another note, I'm reading a new book and last night I read something in it that I loved - something that speaks to my approach to almost everything I do, including my "treasure hunting," blogging and this little French antique store of mine.


In The Olive Farm, author Carol Drinkwater writes,


"So many dreams. But the stuff of dreams are the food of life."

I simply love that thought. Here's to us dreamers!


Au revoir, Mitty

Thursday, March 8, 2012

The Liebster Blog Love Award!


Sometimes you receive a little "gift" that makes your heart happy and puts a smile on your face. I received such a gift this week in the form of the "Liebster Blog Love Award!"

This award is given to new bloggerss with less than 200 followers that someone feels deserves recognition.  A fellow blogger and MFFC follower, Alicia at Belle Maison et Moi, http://bellemaisonetmoi.blogspot.com,  was so thoughtful and nominated My Faux French Chateau. Thank you Alicia! As a newer blogger as well, Alicia has a really beautiful blog filled with wonderful pictures and thoughtful musings. Take a minute and check it out. I'm sure she'd love to have you follow her blog as well!

Being the inquiring mind that always wants to know details, I researched the word "Liebster" and found that it is a German word that literally translates as “dearest”, “favorite”, and “beloved."  The  Liebster Blog Love Award is a way for bloggers to acknowledge a fellow blogger's dedication and passion to this new art form called "Blogging!"

The rules of  the Liebster Blog Award are:

1. Thank the person who gave you the award and link back to their blog.

2. Copy and paste the award to your blog and

3. Nominate 5 further blogs and let them know by leaving a comment.

Nominating 5 blogs for this award is easy - there are so many new and great blogs that I routinely visit! Check them out when you have a minute and sign up as a public follower if you love their blog!

1.  House of Anne at http://houseofanne-anne.blogspot.com.

2.  Revamped French Maison at http://www.revampedfrenchmaison.com

3.  Acorn Lane Vintage Living at  http://acornlanevintageliving.blogspot.com

4.  Debra Hall Lifestyle at http://debrahalllifestyle.blogspot.com 


5. Haus and Home at http://hausandhome.blogspot.com

Once again, Alicia,

Merci beaucoup!, Mitty

Easy to Make French Tea Towels!

I love to take something simple, plain and inexpensive and turn it into something beautiful! I recently spent a couple of afternoons making French inspired tea towels using a simple heat transfer process!


As always, I found my beautiful French themed images at The Graphics Fairy at graphicsfairy.blogspot.com. If you love working with paper images, you have to check out this blog. Thank you again Karen, aka "The Graphics Fairy," for sharing!

Below is my favorite image found under the category "French" on Karen's website:

French Wreath with Bee


Making these heat transfer decorative tea towels requires:

1. Flour Sack Kitchen Towels
I found mine at Target for $3.99 for (4) towels. The brand that I purchased is RE Style. (There is no need to launder the towels in advance.)


2. Transfer Paper
I found mine at Hobby Lobby for $8.99 for (7) sheets. The brand that I purchased is TransferMagic Inkjet Transfer Paper. This paper is designed for hand iron transfer onto light colored fabric.


3.  An Iron and a hard surface on which to iron
I used a large cutting board for my ironing surface, which I placed on my kitchen counter and covered with an extra flour sack kitchen towel. (A typical ironing board is too soft for the the heat transfer process.)

4. An Image File
Again, The Graphics Fairy has literally thousand of amazing images to choose from. Download the image for printing. (NOTE: Keep in mind that any image with writing has to be a REVERSE image!)

5. Scissors!


The process is simple:

1. Print out your image onto the transfer paper per instructions on package.

2. Cut out your image from the paper leaving a 1/4" or 1/2" margin around the edge of the image. I love to decoupage and am used to cutting around intricate details. You can cut along as much or as little of the pattern detail as you want. Be careful though that you don't leave sharp corners that may lift off  the fabric after washing.

3. Empty any water from your iron and preheat to the cotton setting. Do NOT use steam.

4. Iron the area of the flour sack towel on which you want to place your image so there are no wrinkles. Let your fabric cool.

5.  Turn your cutout paper image side down and, with a hot iron, iron the image onto the fabric. I pressed down on the iron as I ran it across the image, ironing from side to side on the image. Do NOT hold the iron in one place. (Your transfer paper instructions will tell you how long to iron the image onto the fabric.)

6. Allow the fabric to cool and then peel away the backing paper. Your beautiful image will remain on the fabric!

7. Wash and dry the towel before using.


Enjoy!


Au revoir, Mitty